Resistance Band Training: Build Strength Anywhere
You don’t need a gym membership, heavy dumbbells, or a dedicated workout room to build real, functional strength — just a few colorful loops and the right plan.
Picture this: You’re traveling for work, staying in a hotel with a “fitness center” that’s really just a broken treadmill and a wall mirror. Or maybe your gym schedule fell apart when the kids’ after-school activities took over. Sound familiar?
Here’s the thing — resistance band training is one of the most underestimated fitness tools available to everyday adults. It’s portable, affordable, and backed by a growing body of research showing it can produce strength and muscle gains comparable to free weights in many scenarios.
Yet most people either dismiss bands as warm-up accessories or grab them once and give up because they don’t know how to use them effectively. This guide changes that.
By the end, you’ll understand exactly how resistance bands work, how to structure a full-body routine, what mistakes to avoid, and how to track real progress — whether you’re a complete beginner or someone looking to add a versatile tool to an established training plan.
Why Resistance Band Training Matters More Than You Think
Resistance bands aren’t just for physical therapy clinics or warm-up sets — though they excel at both. When used intentionally, they can serve as a complete strength training system that challenges your muscles throughout the entire range of motion.
That last part is key. Unlike dumbbells, which create the most resistance at specific angles due to gravity, bands create what’s called ascending resistance — the tension increases as you stretch the band further. This means the hardest part of the movement is often at the top, where your muscles are actually closest to full contraction.
Research published in the Journal of Human Kinetics found that elastic resistance training produces similar electromyographic muscle activation patterns to free-weight training, particularly in exercises like squats, rows, and chest presses. In other words, your muscles are working just as hard — they just experience force differently.
From a practical standpoint, the American College of Sports Medicine (ACSM) recognizes resistance bands as a valid tool for achieving the recommended 2 or more days per week of muscle-strengthening activity for adults. And with gym memberships averaging over $50 per month in the US, a quality set of bands for under $40 can be a genuinely smart investment.
For adults in the 25–60 age range, resistance training isn’t just about looking good. It plays a direct role in preserving bone density, supporting joint health, managing body composition, and maintaining the functional strength that makes everyday life easier. Bands lower the barrier to making that happen consistently.
The Science Behind How Resistance Bands Actually Work
Resistance bands work by using elastic tension to create mechanical load on your muscles — the same fundamental stimulus that triggers muscle adaptation, whether from a barbell or a loop of latex.
When your muscle fibers experience tension under load, microscopic damage occurs. During recovery, your body repairs those fibers and reinforces them, resulting in increased strength and, over time, hypertrophy (muscle growth). This process — known as mechanotransduction — doesn’t care whether the resistance comes from gravity or an elastic band.
Busting the biggest myth: Many people believe bands are “too easy” to build real muscle. This misunderstanding usually comes from using the wrong band resistance level or not applying progressive overload principles. A study published in PLOS ONE that analyzed 23 randomized controlled trials found elastic resistance training to be as effective as conventional resistance training for improving muscle strength in adults — across age groups.
There are several types of bands worth understanding:
- Loop bands (mini bands): Short, flat loops used around ankles, thighs, or wrists — excellent for glute activation and lateral movements.
- Flat resistance bands (therapy bands): Long, flat strips without handles — extremely versatile, often color-coded by resistance level.
- Tube bands with handles: Best for upper body pulling and pressing movements; mimic cable machine exercises most closely.
- Figure-8 and figure-loop bands: Compact, great for targeted upper body work.
Most adults benefit most from a set of tube bands with handles and a pack of loop bands — this combination covers the majority of exercises without redundancy.
One important nuance: bands don’t load your joints the same way free weights do. Because tension increases with stretch rather than being constant, they tend to be more joint-friendly, particularly for people managing mild knee or shoulder discomfort. This doesn’t mean they’re injury-proof, but it does make them a useful option when traditional lifting feels rough on your joints.
How to Get Started: A Practical Resistance Band Routine
The best way to start isn’t to overthink it. Begin with a simple full-body framework three days per week, with at least one rest day between sessions. Here’s how to build that foundation:
Beginner Level (Weeks 1–4)
Focus on movement quality and learning to feel the muscle you’re targeting. Use a light-to-medium resistance band and perform 2–3 sets of 12–15 reps per exercise. Rest 60–90 seconds between sets.
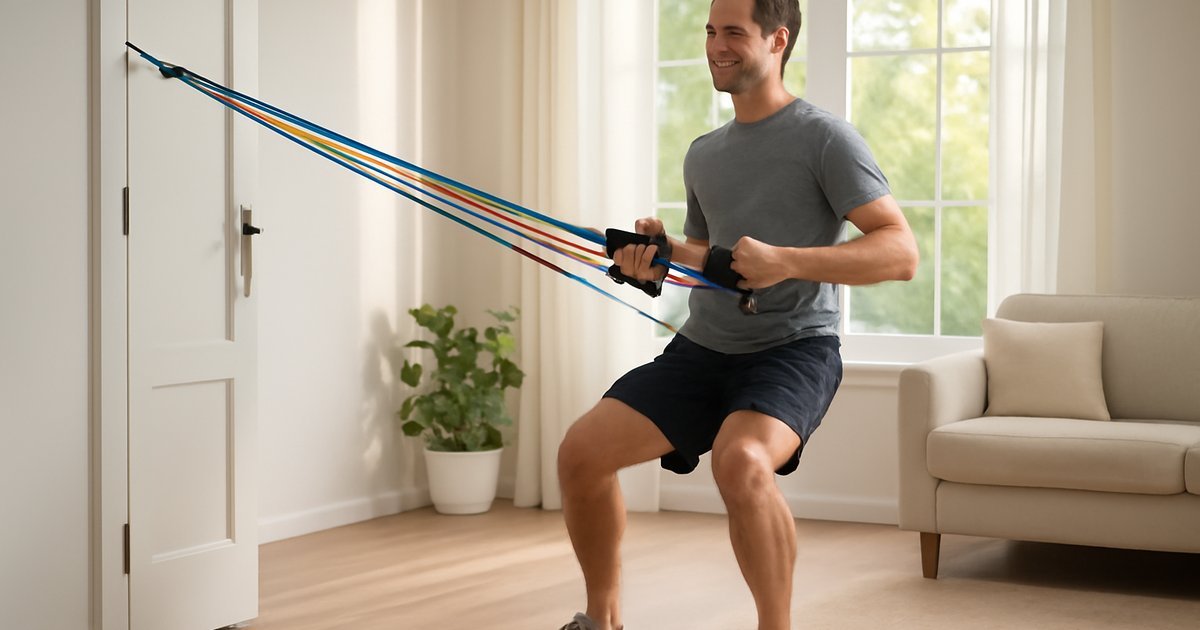
- Banded squat: Loop band above knees, feet hip-width. Drive knees out as you lower. Targets quads, glutes, adductors.
- Seated row (tube band): Sit on the floor, loop band around your feet, pull handles toward your torso. Targets mid-back, biceps.
- Banded push-up: Loop band across your upper back, hold ends under each hand. Adds resistance to standard push-up. Targets chest, triceps, shoulders.
- Glute bridge with band: Band above knees, drive hips up and press knees outward. Targets glutes, hamstrings.
- Banded lateral walk: Band around ankles, slight squat position, step side to side. Targets hip abductors, glutes.
- Overhead press (tube band): Stand on band, press handles overhead. Targets shoulders, triceps.
Intermediate Level (Weeks 5–10)
Introduce heavier resistance bands, add a fourth exercise day (upper/lower split), and incorporate supersets for efficiency. Aim for 3–4 sets of 8–12 reps.
- Romanian deadlift with band under feet
- Single-arm bent-over row
- Pallof press (core anti-rotation)
- Banded hip thrust
- Face pulls for shoulder health and posture
You can also pair resistance bands with bodyweight exercises from programs like Calisthenics for Adults: Build Real Strength Anywhere for a well-rounded, equipment-minimal training system.
Advanced Options
Use bands as a supplement to barbell or dumbbell training — attaching them to barbells for variable resistance squats and deadlifts is a technique used in powerlifting programs. Alternatively, apply progressive overload principles systematically by increasing resistance level, reducing rest periods, or adding tempo training (slow eccentric phase) to intensify band work.
Common Mistakes That Sabotage Results
Most people who try resistance band training and quit do so because of avoidable mistakes — not because bands don’t work. Here are the most common ones:
1. Using the same band for everything
One band does not fit all exercises. Your legs and back are significantly stronger than your arms and shoulders. Using a light band for squats means you’re barely stimulating your lower body, while using a heavy band for lateral raises may compromise your form. Invest in at least 3 resistance levels and match them intentionally to each exercise.
2. Not controlling the movement
Bands want to snap back quickly. If you’re allowing the elastic recoil to do the work on the way back (the eccentric phase), you’re leaving most of the benefit on the table. Deliberately slow down the return — aim for 2–3 seconds on the way back. This is where a significant amount of muscle-building stimulus occurs, according to research on eccentric muscle contractions published in the Journal of Applied Physiology.
3. Anchoring bands incorrectly
A band that slips, snaps, or moves mid-rep can cause injury or frustration. Always check that door anchor attachments are secure before pulling. Never anchor bands to anything that could break or move. Replace bands that show cracks, discoloration, or tears — latex degrades over time, especially with UV exposure.
4. Skipping progressive overload
This is the most common reason people plateau. Doing the same band, same reps, same sets every week won’t produce continued adaptation. Follow the same principle you’d apply to any strength program: once you can complete the top end of your rep range with good form for all sets, it’s time to progress. Increase resistance, add a set, reduce rest time, or slow your tempo.
5. Neglecting lower body and pulling movements
Many self-designed band routines end up being chest-and-arm-heavy, skipping the legs and back. This creates muscular imbalances over time and underutilizes the bands’ full potential. A balanced program includes at least as much pulling (rows, face pulls, pull-aparts) as pushing (presses, push-ups), plus dedicated lower body work.
What to Eat to Support Resistance Band Training
Training with bands creates the same physiological demand for recovery as other resistance training — which means nutrition matters just as much here as in any gym program.
Protein: The Academy of Nutrition and Dietetics recommends that active adults consume between 1.2 and 2.0 grams of protein per kilogram of body weight daily to support muscle repair and adaptation. For a 160-pound (73 kg) adult, that’s roughly 88–146 grams of protein per day. Prioritize complete protein sources: eggs, chicken, Greek yogurt, salmon, legumes with whole grains, or a quality whey or plant-based protein supplement if needed.
Carbohydrates: Don’t fear carbs around your workouts. Carbohydrates are your muscles’ preferred fuel source during resistance training. A small meal or snack with 20–40 grams of carbohydrates within 1–2 hours before training can support performance and energy. Think: a banana with nut butter, oatmeal with berries, or whole grain toast with eggs.
Post-workout recovery window: Research consistently supports consuming protein within 2 hours post-exercise to optimize muscle protein synthesis. Combining 20–40 grams of protein with carbohydrates in that window — a smoothie with Greek yogurt and fruit, for example — supports both recovery and glycogen replenishment, per USDA dietary guidance on athletic nutrition.
Hydration: Banded workouts, especially full-body circuits, generate significant sweat. The National Academy of Medicine recommends approximately 3.7 liters (125 oz) of total fluid daily for men and 2.7 liters (91 oz) for women, with additional intake to replace exercise-related fluid loss. Mild dehydration — as little as 2% body water loss — has been shown to impair muscular strength and endurance, according to research reviewed by the American College of Sports Medicine.
For more detail on protein strategies, see Optimal Protein Intake: Your Science-Backed Guide.
How Long Until You See Results — and What to Track
Honest answer: most people begin noticing strength improvements within 2–4 weeks of consistent training. These early gains are largely neurological — your nervous system gets better at recruiting muscle fibers efficiently before actual muscle tissue changes become visible.
Visible changes in muscle definition and body composition typically emerge after 6–12 weeks of consistent training, provided nutrition supports the process. This timeline varies significantly based on training frequency, starting fitness level, sleep quality, stress levels, and diet.
Metrics worth tracking:
- Rep progression: Are you completing more reps per set with the same band week over week? That’s a clear sign of strength adaptation.
- Band progression: Moving from a light to a medium band on a given exercise is a concrete strength milestone.
- Exercise quality: Is your form cleaner? Can you control the eccentric phase more consistently? These are genuine improvements.
- Energy and recovery: Many people report improved energy, reduced daily soreness, and better sleep quality within 3–4 weeks of starting a regular resistance training routine.
- Photos every 4 weeks: Body composition changes are slow and subtle. Weekly mirror-checks are frustrating. Monthly comparison photos under consistent lighting tell a much more honest story.
If you’re 6–8 weeks in and feel like nothing is changing, reassess your progressive overload application, protein intake, and sleep quality before concluding the training isn’t working. And if you have underlying health conditions or experience pain during exercises, consulting a certified personal trainer or physical therapist for a personalized assessment is always the right move.
Pairing your strength work with complementary training like Mobility Training can also accelerate visible progress by improving movement quality and reducing injury risk.
Frequently Asked Questions
Can resistance bands really replace weights for building muscle?
For most recreational fitness goals — improved strength, muscle tone, body composition, and functional fitness — yes, bands can be a highly effective primary tool. The research supports this, particularly for adults who aren’t pursuing competitive bodybuilding or powerlifting. The key is applying progressive overload consistently and using appropriate resistance levels, not defaulting to the same light band indefinitely.
How many resistance bands do I actually need to start?
A practical starter set includes one pack of mini loop bands (typically 5 resistance levels) and one set of tube bands with handles (3 resistance levels: light, medium, heavy). You can get started with less, but having multiple resistance options from day one prevents the frustration of feeling stuck with a single tension level. Total cost is typically $25–$45 for a quality set.
Are resistance bands safe for people with joint problems?
Generally, bands are considered more joint-friendly than heavy free weights because the resistance profile is different — load increases gradually rather than being fixed, and bands don’t create axial compression on the spine the way loaded barbells can. That said, “joint-friendly” doesn’t mean appropriate for all conditions. If you have a diagnosed joint condition, consult with your physician or a physical therapist before starting any resistance training program.
How often should I train with resistance bands?
The ACSM recommends at least 2 days per week of muscle-strengthening activity for health benefits, with most research on body composition and performance improvements showing optimal results at 3–4 sessions per week. Each muscle group benefits from 48 hours of recovery between sessions, so full-body workouts 3x per week or an upper/lower split 4x per week are both practical, evidence-supported approaches.
Do resistance bands wear out? How do I know when to replace them?
Yes — latex bands degrade over time, especially with frequent use, UV exposure, and contact with oils or sweat. Inspect your bands regularly for surface cracks, white stress marks, discoloration, or any thinning areas. A band that snaps during use can cause injury. Most quality bands used 3–4 times per week last 1–2 years with proper storage (away from sunlight, hung or loosely coiled rather than tightly wrapped).
Start Simple, Stay Consistent
Resistance band training works — not because it’s a shortcut or a gimmick, but because it applies the same fundamental principles as any effective strength training program: progressive resistance, full range of motion, adequate recovery, and consistency over time.
You don’t need to start with a perfect routine. You need to start with something you’ll actually do three times a week, in whatever space and time you have. A 30-minute full-body band workout in your living room beats a theoretical gym plan that never happens.
Pick one or two exercises per muscle group from the beginner list in this guide. Grab a pair of bands. Do the work. Track your reps. Progress when you can. That’s the entire formula.
Small, consistent steps taken over months create the kind of strength and body composition changes that feel genuinely transformative. And the best part? Your bands fit in a carry-on bag.
This article is for informational and educational purposes only. The content is not intended to replace professional medical, nutritional, or fitness advice. Always consult a qualified healthcare provider, registered dietitian, or certified fitness professional before starting a new health program or making significant changes to your lifestyle.
Content reviewed by our wellness editorial team, with references to peer-reviewed research and guidelines from leading health organizations.